Requirements
The requirements listed below are the ones used for the development of pibooth,
but other configuration may work fine. All hardware buttons, lights and printer
are optional, the application can be entirely controlled using a keyboard, a
mouse or a touchscreen.
Warning
Using a Pi Camera, the preview is visible only on a screen connected
to the HDMI or DSI connectors (the preview is an overlay managed at
GPU low level). It also means that pibooth can not be started
throught SSH tuneling. Even with X11 forwarding enabled (ssh -X ...)
the preview will not be visible.
Hardware
1 Raspberry Pi 3 Model B (or higher)
1 Camera (Raspberry Pi Camera v2.1 8 MP 1080p or any DSLR camera compatible with gPhoto2 or any webcam compatible with OpenCV )
2 push buttons
2 LEDs
2 resistors of 100 Ohm
1 printer
Software
Raspberry Pi OS Buster with desktop
Python
3.7.3libsdl2
2.0libgphoto2
2.5.27libcups
2.2.10
Install
Here is a brief description on how to set-up a Raspberry Pi to use this software.
If you intend to develop on pibooth, an editable/customizable version can be
installed. Instead of doing step 8. of the below procedure, follow
instructions here.
Manual procedure
Download the Raspbian image and set-up an SD-card. You can follow these instructions.
Insert the SD-card into the Raspberry Pi and fire it up. Use the
raspi-configtool to configure your system (e.g., expand partition, change hostname, password, enable SSH, configure to boot into GUI, etc.).Hint
Don’t forget to enable the camera in raspi-config.
Upgrade all installed software:
sudo apt-get update
sudo apt-get full-upgrade
Install SDL2 (and extras) which is required by
pygame 2+:sudo apt-get install libsdl2-*
Optionally install the last stable
gPhoto2version (required only for DSLR camera):wget https://raw.githubusercontent.com/gonzalo/gphoto2-updater/master/gphoto2-updater.sh wget https://raw.githubusercontent.com/gonzalo/gphoto2-updater/master/.env chmod +x gphoto2-updater.sh sudo ./gphoto2-updater.sh
Optionally install
CUPSto handle printers (more instructions to add a new printer can be found here ):sudo apt-get install cups libcups2-dev
Optionally install
OpenCVto improve images generation efficiency or if a Webcam is used:sudo apt-get install python3-opencv
Install
piboothfrom the pypi repository:sudo pip3 install pibooth[dslr,printer]
Hint
If you don’t have
gPhoto2and/orCUPSinstalled (steps 5. and/ or 6. skipped), remove printer and/or dslr under the[]
Automated procedure
Alternatively, you can use Ansible to install pibooth automatically. A playbook can be found here (thank you TiJof).
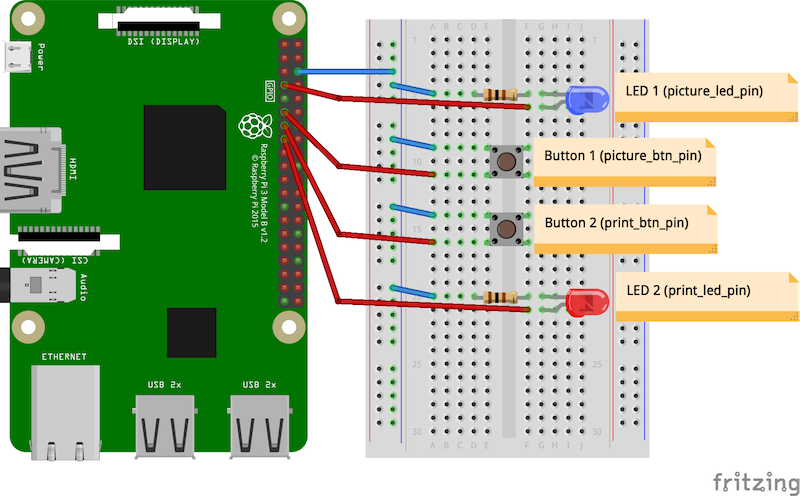
Circuit diagram
Here is the diagram for hardware connections. Please refer to the default configuration file. to know the default pins used (physical pin numbering).
An extra button can be added to start and shutdown properly the Raspberry Pi.
Edit the file /boot/config.txt and set the line:
dtoverlay=gpio-shutdown
Then connect a push button between physical pin 5 and pin 6.